Introduction:
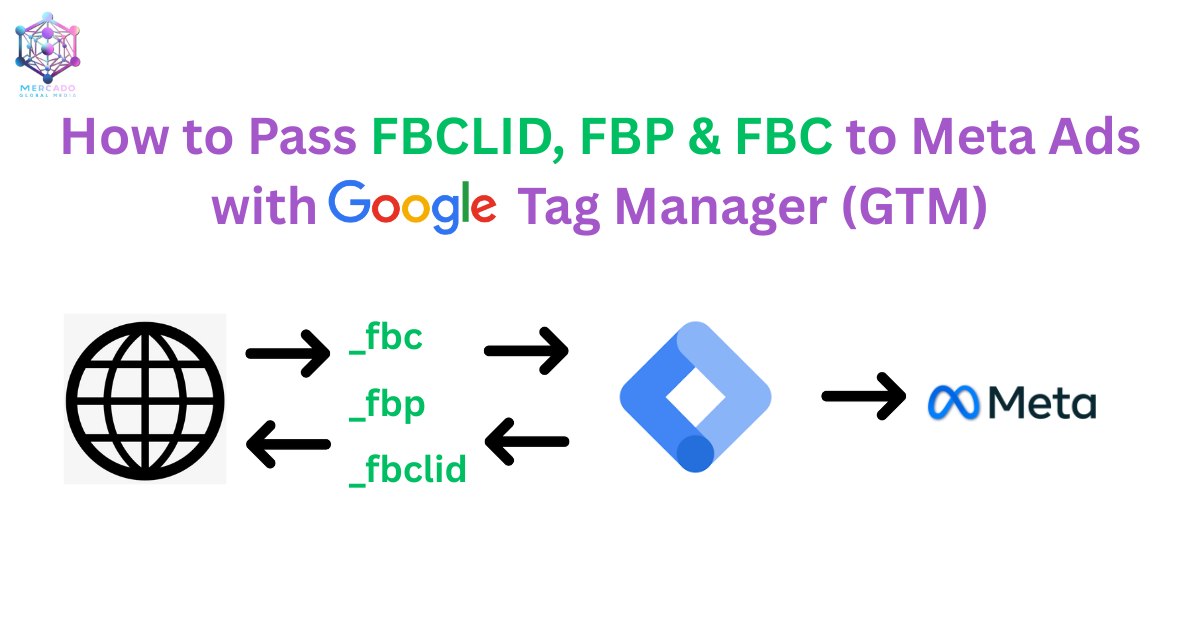
In this article, you’ll get a clear understanding of how to pass FBCLID FBP FBC to Meta Ads using GTM (Google Tag Manager) for accurate tracking. Correctly sending these parameters ensures Meta can match user journeys more effectively, improving attribution, targeting, and campaign optimization. Since Meta Ads heavily rely on both browser Pixel and the Conversions API (CAPI), setting up FBCLID, FBP, and FBC correctly is crucial for better performance and reliable reporting.
However, due to tracking restrictions (ITP, cookie expiration, privacy regulations), Meta introduced matching parameters like FBCLID, FBP, and FBC. These identifiers are crucial for:
- Strengthening Event Match Quality (EMQ) in Events Manager.
- Ensuring deduplication between Pixel (browser events) and CAPI (server events).
- Preserving attribution accuracy when cookies drop or reset.
For Meta Ads (Facebook & Instagram), three critical parameters help marketers improve attribution, optimize campaigns, and enhance event matching:
- FBCLID (Facebook Click ID) – Facebook Click Identifier, appended to URLs when a user clicks on a Facebook ad. It uniquely identifies the ad click. (A unique identifier appended to ad click URLs.)
- _fbc cookie / fbc parameter – Facebook Browser ID, a first-party cookie value stored in the user’s browser. It helps link events back to the same browser (A browser cookie derived from FBCLID, used to persist click attribution).
- _fbp cookie / fbp parameter – Facebook Click ID Cookie, derived from FBCLID and stored in a cookie. It allows Meta to attribute server events to specific ad clicks (A browser cookie generated by Meta Pixel to track users across sessions).
Together, these parameters improve conversion attribution, optimize delivery, and increase ad relevance.
By ensuring these parameters are captured and passed, you increase event match quality (EMQ), leading to better attribution, reporting, and optimization of Meta Ads campaigns.
In this article, we’ll break down what FBCLID, FBP, and FBC are, why they matter, and how to implement them in GTM and your Meta Pixel setup (Implement FBCLID FBP FBC using GTM).
Understanding the Parameters (FBCLID FBP FBC):
FBCLID (Facebook Click Identifier)
- Added automatically to URLs when a user clicks a Facebook ad.
- Example:
https://example.com/?fbclid=IwY2xjawMKanZleHRuA2FlbQIxMABicmlkET...
- FBCLID uniquely identifies the click that drove the session.
- FBCLID needed to build _fbc cookies for CAPI event matching.
Benefits of FBCLID:
- Improved conversion attribution
- Better optimization of campaigns
- Higher ad performance
FBP (Facebook Browser ID)
- Created automatically by Meta Pixel when first-party cookies are enabled.
- Stored in _fbp cookie.
- Format:
fb.1.<creationTime>.<randomNumber>- Example value:
fb.1.1692716040874.1234567890Identifies the same browser across sessions, useful for remarketing and attribution (Used to identify a specific browser/website user).
FBC (Facebook Click ID Cookie)
- Built using the FBCLID when a user comes from a Facebook ad.
- Stored in the browser when FBCLID is available.
- Stored in _fbc cookie.
- Format:
fb.1.<timestamp>.<fbclid>- Example:
fb.1.1709136167115.IwAR2F4-dbP0l7Mn1IawQQGCINEz7PYXQvwjNwB_qa2ofrHyiLjcbCRxTDMgk- FBC helps Meta link the conversion back to the exact ad click.
- FBC used in both Pixel events and Conversions API payloads for user matching.
Official Meta Recommendations (FBCLID FBP FBC)
From Meta’s documentation:
- Always send fbc and fbp parameters whenever available.
- Refresh values regularly, since cookies and sessions may expire.
- Correct formatting is critical (fb.1.timestamp.value).
- For Conversions API, include these fields in user_data for better event match quality.
Step-by-Step Implementation Guide – FBCLID FBP FBC using GTM
Integration of these parameters into a website can be done using Meta Pixel and Google Tag Manager (GTM).
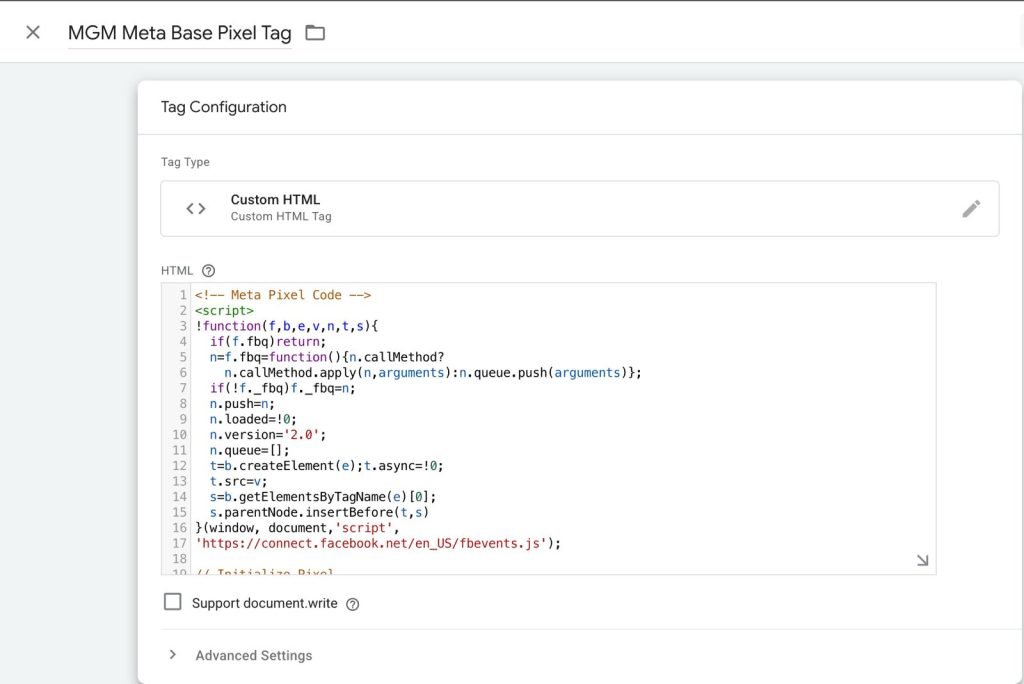
Step 1 – Optimized Base Pixel Code
Here’s an optimized base pixel that also sets _fbp and _fbc cookies:
<!-- Meta Pixel Code -->
<script>
!function(f,b,e,v,n,t,s){
  if(f.fbq)return;
  n=f.fbq=function(){n.callMethod?
    n.callMethod.apply(n,arguments):n.queue.push(arguments)};
  if(!f._fbq)f._fbq=n;
  n.push=n;
  n.loaded=!0;
  n.version='2.0';
  n.queue=[];
  t=b.createElement(e);t.async=!0;
  t.src=v;
  s=b.getElementsByTagName(e)[0];
  s.parentNode.insertBefore(t,s)
}(window, document,'script',
'https://connect.facebook.net/en_US/fbevents.js');

// Initialize Pixel
fbq('init', 'YOUR_PIXEL_ID');

// Track PageView with fbclid + eventID
fbq('track', 'PageView', {
    fbclid: '{{JS – fbclid}}'
}, {
    eventID: '{{Event ID Variable}}'
});

// Set _fbc and _fbp cookies for your domain
var fbcValue = '{{JS – _fbc}}';
var fbpValue = '{{JS – _fbp}}';

if (fbcValue) {
    document.cookie = "_fbc=" + fbcValue +
        "; domain=.yourdomain.com; path=/; SameSite=None; Secure";
}

if (fbpValue) {
    document.cookie = "_fbp=" + fbpValue +
        "; domain=.yourdomain.com; path=/; SameSite=None; Secure";
}
</script>

<noscript>
<img height="1" width="1" style="display:none"
src="https://www.facebook.com/tr?id=YOUR_PIXEL_ID&ev=PageView&noscript=1" />
</noscript>
<!-- End Meta Pixel Code -->
Setting Up FBCLID FBP FBC GTM Variables
To make this fully automated, you’ll create 3 Custom JavaScript Variables in Google Tag Manager.
1) JS – fbclid (from URL)
function() {
  var params = new URLSearchParams(window.location.search);
  return params.get('fbclid') || '';
}
This captures fbclid when a user lands via a Facebook ad.

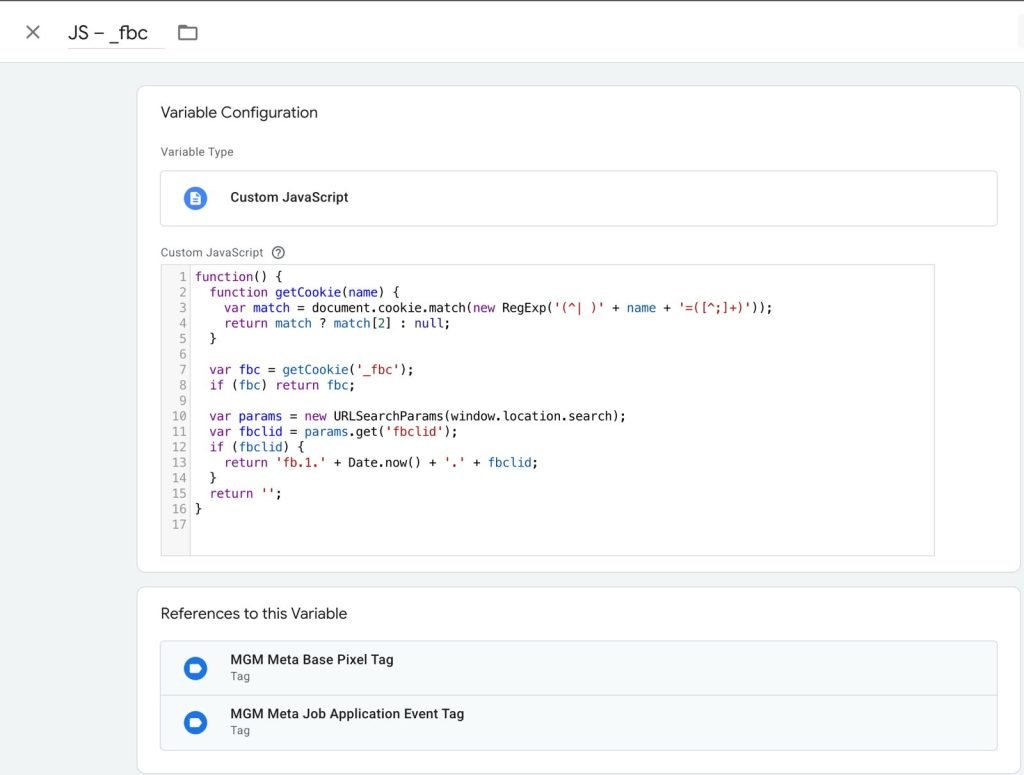
2) JS – _fbc (from cookie or generate if missing)
function() {
  function getCookie(name) {
    var match = document.cookie.match(new RegExp('(^| )' + name + '=([^;]+)'));
    return match ? match[2] : null;
  }

  var fbc = getCookie('_fbc');
  if (fbc) return fbc;

  var params = new URLSearchParams(window.location.search);
  var fbclid = params.get('fbclid');
  if (fbclid) {
    return 'fb.1.' + Date.now() + '.' + fbclid;
  }
  return '';
}
- This reads existing _fbc cookie.
- If missing but URL has fbclid, generates a new _fbc in correct format.
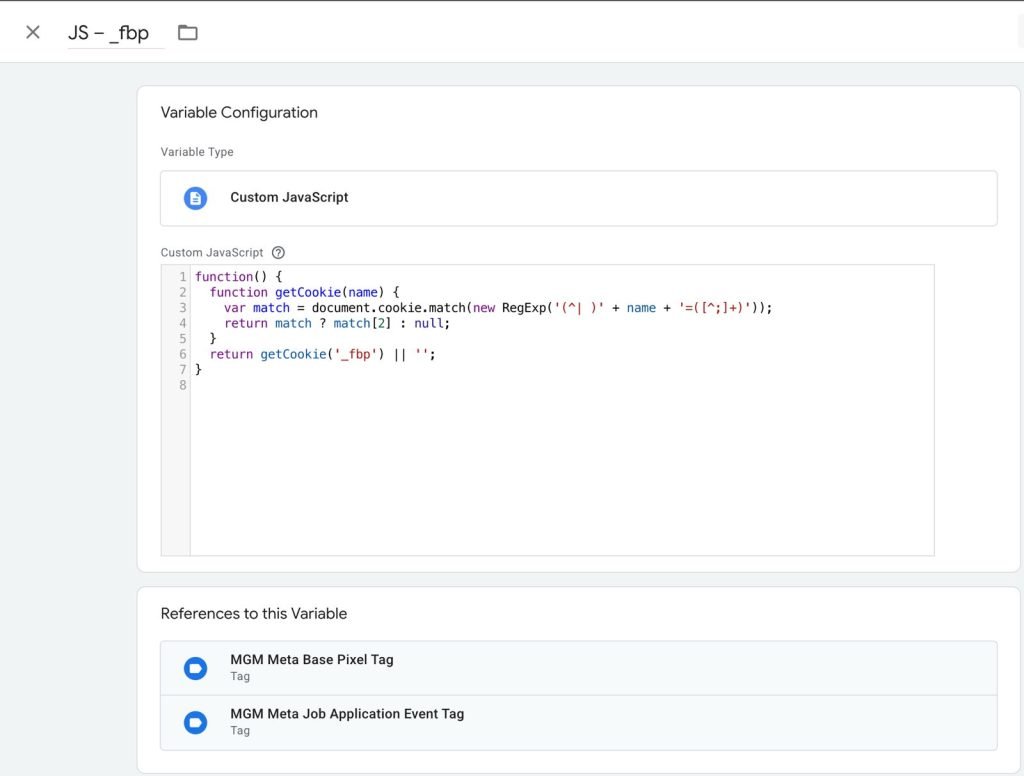
3) JS – _fbp (from cookie)
function() {
  function getCookie(name) {
    var match = document.cookie.match(new RegExp('(^| )' + name + '=([^;]+)'));
    return match ? match[2] : null;
  }
  return getCookie('_fbp') || '';
}- This ensures _fbp is always captured.
Using the FBCLID FBP FBC Variables in GTM Event Tags
When firing custom events, you must include eventID, fbp, and fbc. Example:
<script>
fbq('trackCustom', 'JobApplication', {
  eventID: '{{Event ID Variable}}',
  fbp: '{{JS – _fbp}}',
  fbc: '{{JS – _fbc}}'
});
</script>
This ensures:
- eventID enables deduplication with CAPI events.
- fbp connects to the browser identity.
- fbc ties conversion back to ad clicks.

Step-by-Step Setup Process
- Install Meta Pixel in GTM.
- Create 3 JS Variables (fbclid, _fbc, _fbp).
- Create Event ID Variable (e.g., random unique ID generator).
- Modify Pixel base code (use optimized version above).
- Add event tracking (e.g., JobApplication, Purchase).
- Test in GTM Preview & Meta Pixel Helper.
- Verify parameters (fbp, fbc, eventID) appear in Events Manager > Test Events.
Event Tracking Example in Action
For a Job Application Event:
<script>
fbq('trackCustom', 'JobApplication', {
  eventID: '{{Event ID Variable}}',
  fbp: '{{JS – _fbp}}',
  fbc: '{{JS – _fbc}}'
});
</script>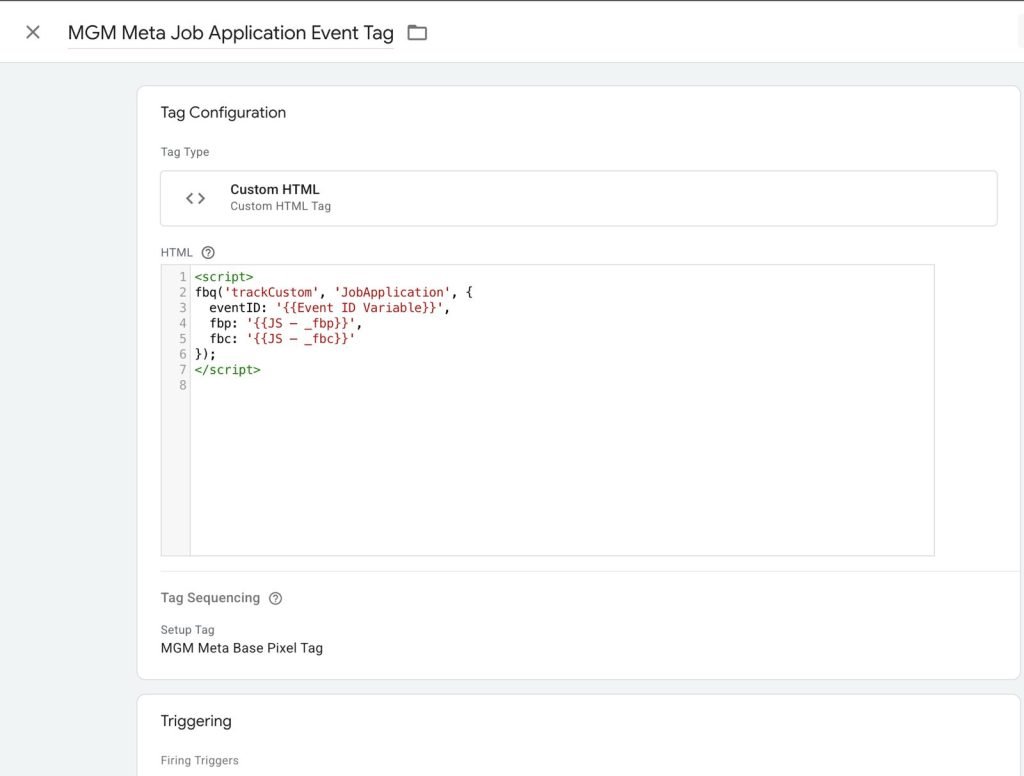
Previewing FBCLID FBP FBC Data Extraction in GTM Tag Assistant
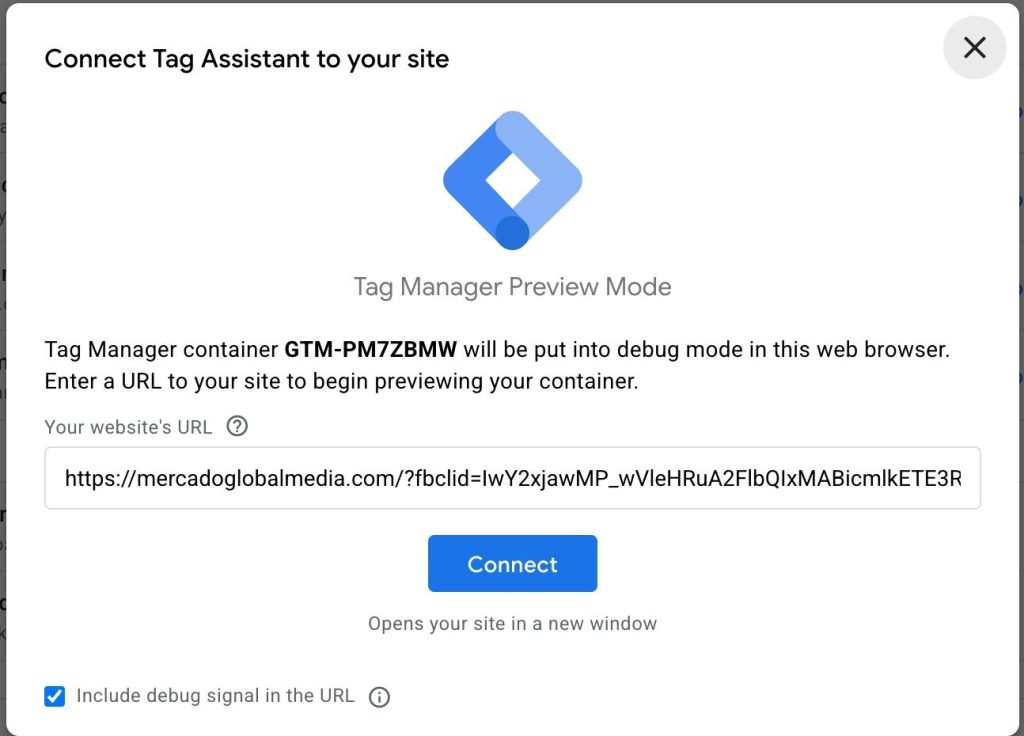
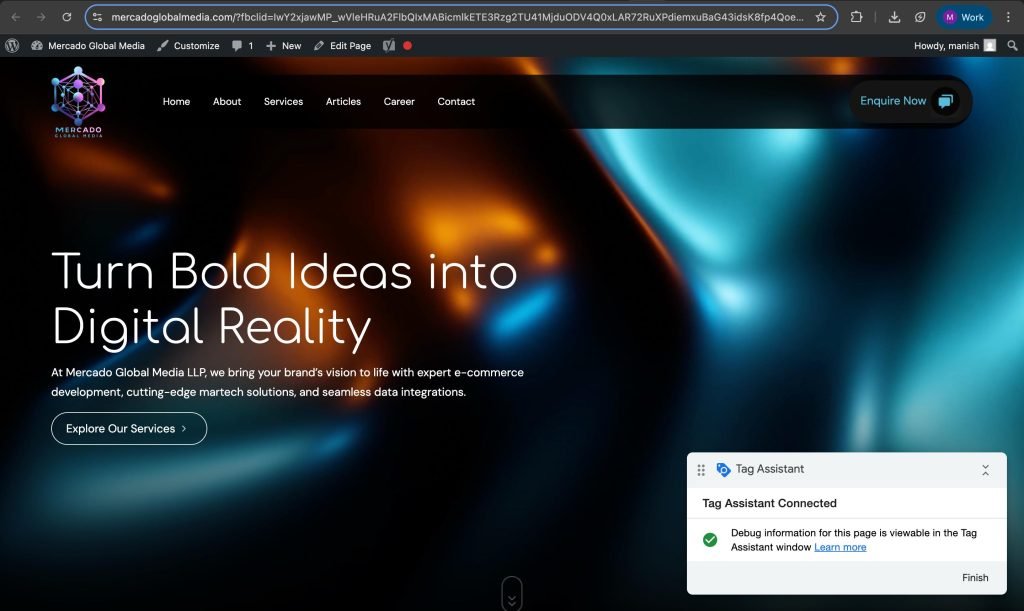
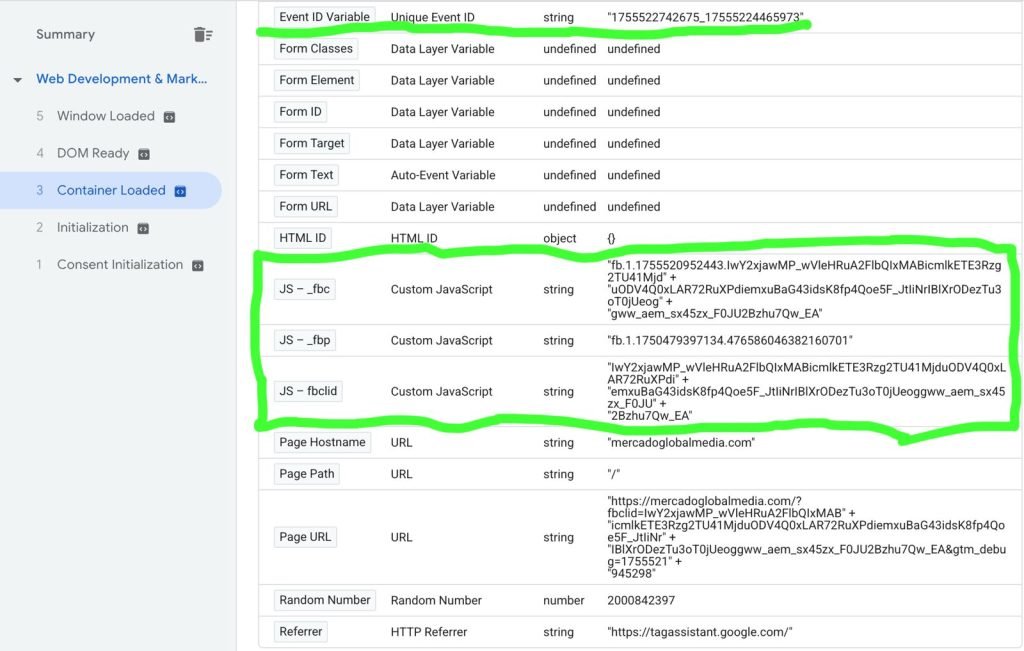
To validate that the parameters are being captured correctly, you can use Tag Assistant in preview mode. By testing with the following link:
https://mercadoglobalmedia.com/?fbclid=IwY2xjawMP_wVleHRuA2FlbQIxMABicmlkETE3Rzg2TU41MjduODV4Q0xLAR72RuXPdiemxuBaG43idsK8fp4Qoe5F_JtIiNrIBlXrODezTu3oT0jUeoggww_aem_sx45zx_F0JU2Bzhu7Qw_EAyou can preview how the container loads and extracts the variables. In the screenshot below, you can see how _fbc, _fbp, and _fbclid values are accurately captured as part of the container’s loaded variables in GTM.

Integration with Conversions API (CAPI)
When sending events server-side, you should include the fbc and fbp values within the user_data object. For example, when a custom event such as JobApplication is fired with the fbp, fbc, and eventID parameters, the payload that Meta (Facebook) receives will look like the following JSON-style representation:
Example payload:
{
  "event_name": "JobApplication",
  "event_time": 1693456789,
  "event_id": "1234567890abcdef",
  "event_source_url": "https://www.example.com/careers/job-application",
  "action_source": "website",
  "user_data": {
    "fbp": "fb.1.1693456789123.987654321",
    "fbc": "fb.1.1693456789123.AbCdEfGhIjKlMnOpQrStUvWxYz"
  },
  "custom_data": {
    "job_role": "Marketing Specialist",
    "location": "Bangalore"
  }
}
Explanation of Each Key:
- event_name → “JobApplication” (from your trackCustom call).
- event_time → Unix timestamp (in seconds) when the event is triggered.
- event_id → Your GTM variable {{Event ID Variable}}, used for event deduplication between Pixel and CAPI.
- event_source_url → Page URL where the event was triggered.
- action_source → “website” (since this comes from the web pixel).
- user_data → Includes identifiers:
- fbp → _fbp cookie value.
- fbc → Encoded fbclid value if available, else null.
- fbp → _fbp cookie value.
- custom_data → Optional parameters you pass (example fields like role, location, value, currency, etc.).
This is the structure that will reach Meta’s Event Manager (whether sent via Pixel → CAPI gateway or directly via browser Pixel).
Key Takeaways
- FBCLID → _fbc → fbc parameter (click-based attribution).
- _fbp → fbp parameter (browser/session identifier).
- Always format values correctly (fb.1.timestamp.value).
- Always send fbc and fbp with both Pixel and CAPI events for maximum attribution.
- Use GTM to automate extraction and ensure values are never blank.
Conclusion
By setting up FBCLID, FBP, and FBC correctly using GTM:
- You improve tracking accuracy
- Meta can better deduplicate events between Pixel & CAPI
- Event Match Quality (EMQ) scores improve → better optimization
- Campaigns benefit from more accurate attribution & lower wasted spend
This makes your Facebook Ads more effective and future-proof against browser privacy changes.
This approach ensures end-to-end attribution coverage: Pixel captures browser-side values, GTM passes them dynamically, and CAPI mirrors the same data server-side. This is the gold standard Meta recommends for better attribution, higher match quality, and optimized ads.
Need Help?
If you’re unsure about setting up Facebook CAPI or passing parameters like _fbc, _fbp, and _fbclid correctly, our team can help.
Contact us today to get expert assistance in setting up tracking, Tag Manager, and advanced marketing technology for your business.